Welcome to our first tutorial - perfect to get you started on your new Eye of the Beholder quilt pattern or help you with those tricky spots. If you're in the Colorado area, why not consider booking a workshop with me?
If you have a question that's not addressed here, please feel free to contact me. I would love to help you and, who knows, your question may end up being a blog inspiration!
Reverse Needle Turn Applique by Hand- Using our Trace, Baste, Snip & Stitch Technique

Scroll & Fan, Medallion III being made
TRACE: Transferring your pattern.
Use a lightbox to trace your pattern.
Put your pattern down face up. Then, lay your background fabric, wrong side up, on top of the pattern. If you can easily see the pattern through the material, you want to secure the pattern to your surface, and the material to the pattern. I usually use scotch tape or packing tape. Once pattern and material are secure from shifting, you can begin to trace the pattern with your pencil.

Here my fabric is wrong side up on top of my pattern piece. Put this on top of the light box so you can trace the design.
Some light materials are not easy to see through, or you may have chosen a medium color value for your background material. If this is the case, you will need a light box.
Pin your material, wrong side up, on top of the pattern. Place on your light box and begin tracing the pattern with your pencil. My light box is only about 14 in x 20 in, so I have to move my piece and trace in sections.
If you don’t have a light box, you can use a window for the same purpose. The determining factor as to your layering preparation will be the size of your window and the size of the pattern. If the pattern fits in its entirety on the window, tape the pattern to the window and then tape the material, wrong side up atop the pattern.
If the pattern is bigger than your window pane, pin material, wrong side up, atop the pattern. Then tape the layered piece to your window and trace in sections.
Fleur de Lis pattern being traced.
BASTE: Pin-Basting your piece.
Layer your top material, wrong side up, and background material, wrong side up (the traced pattern will be on top). Iron the layers together. Using safety pins, pin through your two layers, starting at the center and working out. Pins can be spaced 6-8 inches apart.
The pins keep your layers together while you are thread basting the piece.
Traced and Pin Basted piece, from the wrong side.
BASTE: Thread Baste your appliqué piece.
Thread your No. 7 Sharp needle with contrasting thick thread. Working from the back of your pin-basted piece, stitch along all your drawn lines.
Use a running stitch about ¼ inch in length, about ¼ inch apart. Thread basting is how you transfer your pattern to the front of your piece.
If you are working on a small piece, or a curved edge of the pattern, you will want your stitches to be smaller and closer together. Remember, once you begin to appliqué, these stitches are what provide your lines to sew on.
This picture shows a basted piece from the wrong side.
This picture shows the same basted piece from the right side.
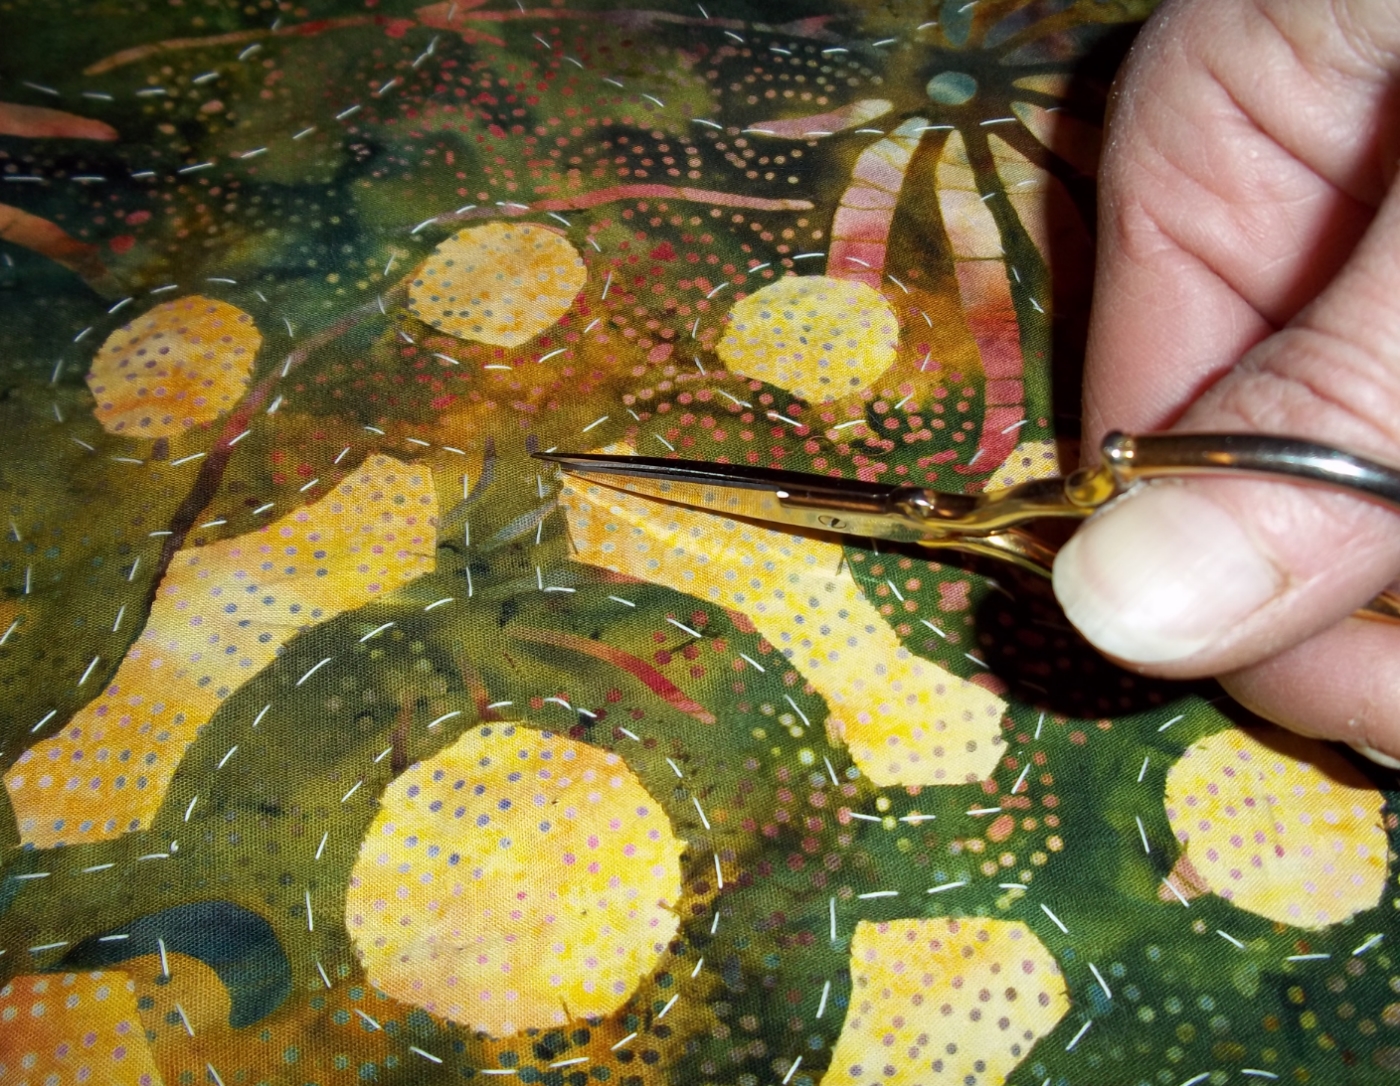
SNIP: Trimming your pattern.
Now, follow this step-by-step guide for some handy help trimming your thread-basted piece.
Step 1:
Flip your piece over to the front. Very important, refer to your pattern so you know what you are going to cut away. I start sewing in the middle and work out, so I trim in the middle and work out as well, trimming and sewing as I go. You can either trim your whole piece at once, or trim a little bit at a time, and stitch for a while. Then baste and stitch the next section or shape.
Step 1: Here you can see I have now trimmed the top fabric away to within 1/8 - 1/4 inch.
To trim, carefully separate the top layer from the background layer and make a small snip through the top material only. Then, slide your scissors between the layers and trim the top material away, trimming to within 1/8" – 1/4" away from your basting thread. You will now be able to see your background material where you have trimmed away a section of your top material.
Step 2:
Using your small, sharp scissors, clip the curves and corners.
Step 2: Use small scissors to clip your inside corners.

Step 2: Again, using small scissors, trim your inside curves.
Step 3:
Clip every other basting thread for the area you are going to begin sewing down.
Step 3: If you look closely at the middle of the photo, you can see that I’ve clipped the basting threads on the inner circle, in preparation to do my needleturn applique.
STITCH: Reverse Needle-turn Appliqué by hand
Now on to the applique….
Thread your No. 11 Milliners needle with thread that matches your top material. Knot your thread. Pull out one of the clipped basting threads with your needle, then turn under the raw edge to the basting line. Coming from the back, bring your needle up through all layers, catching the folded under edge. Send your needle back down into the background material right next to where you came up. Bring needle up through folded edge again. You've taken your first stitch. Your folded edge is now anchored, and you have begun to sew.
Here’s my thumb, holding down all the layers in preparation for taking my first stitch.
And this is the first stitch, which will anchor all the layers.
Continue in the same manner until the shape is sewn down, as follows:
- Pull out clipped thread with needle
- Fold under raw edge to basting line with needle
- Hold in place
- Take a stitch.
Here's your circle partly done.
...And here's the circle appliquéd down.
At the end, pull needle and thread to the back and knot. Don’t worry about the knots. Once the piece is layered with batting, backing and quilted, you will never see them.
If you look from the back side of the background, you will see your stitch work that follows the drawn traced lines. Isn't it amazing?
Completely appliquéd shape from the wrong side.
OOPS! I snipped my background fabric!
If you accidentally cut your background fabric while trimming away your top material, don’t panic!
Use paper-backed fusible webbing and a scrap of your background fabric to create an iron on patch.
On the paper side of the fusible webbing, trace the shape that you snipped through. Cut it out and iron onto a scrap of your background material. Cut out. Peel off the paper. Working from the back of your background piece, place your customized patch over the snip, and iron in place.
Check out our Workshop page for a hands on workshop in your area.